Topo4GPS for Android — Getting Started
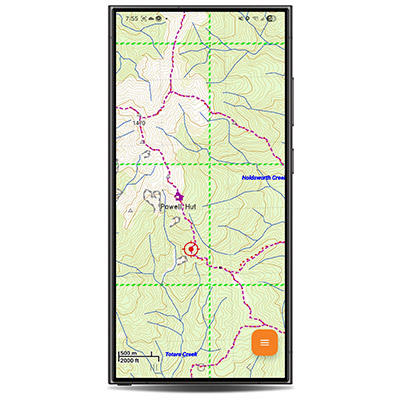
Topo4GPS for Android brings the same detailed New Zealand topographic mapping to your phone that Topo4GPS users have relied on for years on dedicated GPS devices. The map is rich with information drawn from a variety of New Zealand data sources, including contour lines, tracks, huts, roads, rivers, place names and much more.
The app is designed to be simple and intuitive. It works entirely offline once the map has been downloaded — no cell coverage required.
Battery tip: Once you've downloaded the map and are heading into an area with no cell coverage, switch your phone to Flight Mode. Your phone uses a surprising amount of power searching for cell towers that aren't there. GPS will continue to work in Flight Mode, and your battery will last significantly longer.

First Launch & Trial
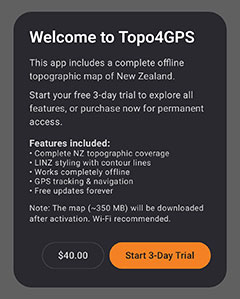
When you first open Topo4GPS, you'll be asked to accept the licence agreement, after which you can choose to start a free 24-hour trial or purchase the full map straight away.
| 1 |
First you'll be prompted whether you'd like Topo4GPS to access your device's location. For full functionality, choose 'While using the app'. Read and accept the licence agreement, when prompted, to proceed.
|
|
| 2 |
Tap "Start Free Trial" to begin your 24-hour trial, or "Purchase" if you'd like to buy the full map immediately.
|
|
| 3 |
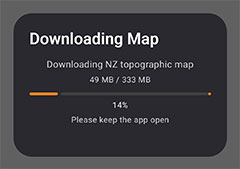
The app will download approximately 460 MB of map data. This requires an internet connection (Wi-Fi recommended). A progress bar will show the download status. Once complete, the app will take a moment to prepare the map for use.
After this initial setup, the app works entirely offline.
|
|
Storage: Once installation is complete the app uses around 500MB - 600MB. More space is needed briefly during the initial download and preperation process, so before beginning we recommend having at least 1 GB of free space.
Navigating the Map
Navigating the map works the same way as most mapping apps you'll be familiar with:
| 📱 |
Pan — Drag the map with one finger to move around.
|
|
| 🔍 |
Zoom — Pinch to zoom in or out. Double-tap to zoom in.
|
|
| 📍 |
Your position — Your current GPS location is shown as a red crosshair on the map. Tap it to view your coordinates, altitude and GPS accuracy.
|
 |
| 🔒 |
Lock to position — From the menu, tap Lock to keep the map centred on your current location as you move. Tap it again to unlock.
|
|
The map is always oriented with true north at the top of the screen.
Searching for Places
Topo4GPS includes an extensive database of nearly 200,000 places across New Zealand — including settlements, huts, tracks, peaks, rivers, roads, and points of interest.
| 1 |
Tap the menu button (bottom right), then tap Search.
|
|
| 2 |
Type at least 2 characters to begin searching. Results appear as you type, sorted by distance from your current location.
|
|
| 3 |
To narrow results, tap the filter icon to the right of the search box. This reveals category chips that let you filter by type — for example, showing only Water Features or Historic sites. Selected filters are shown with a count badge on the filter icon.
|
|
| 4 |
Tap a result to jump directly to that location on the map.
|
|
Creating & Using Marks
Marks (waypoints) let you save locations for future reference — a campsite, a car park, a point of interest, or a destination you want to navigate to.
| 1 |
Centre the map on the location where you'd like to place a mark.
|
|
| 2 |
Tap the menu button, then tap Set Mark. A mark will be placed at the centre of the screen.
|
|
| 3 |
Tap an existing mark to see options: rename it, lock it (to prevent accidental deletion), navigate to it, or delete it.
|
|
Marks are saved between sessions — they'll still be there when you next open the app.
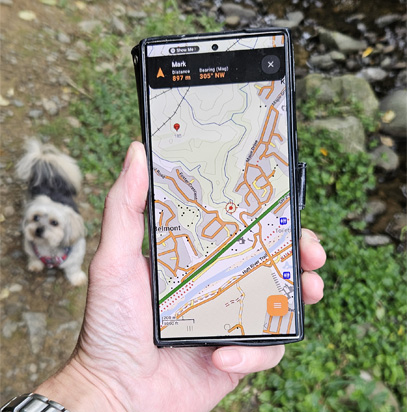
Navigating to a Mark
Once you've created a mark, you can easily navigate to it. The app will display a bearing and distance from your current position.
| 1 |
Tap the mark you want to navigate to, then tap Go To.
|
|
| 2 |
A navigation bar will appear at the top of the screen showing the distance and magnetic bearing to the mark. These update as you move.
The bearing shown is a magnetic bearing, meaning it accounts for New Zealand's magnetic declination. You can use this bearing directly with a compass.
|
|
| 3 |
To stop navigating, tap the × button on the navigation bar.
|
|
Creating & following routes
Plotting a route is a great way to plan a trip and get a feel for the overall distance involved.
| 1 |
To get started, tap Menu > Create route.
|
|
| 2 |
From here, each tap on the map will create a waypoint (you can still zoom in/out or move the map around as you go).
As you create the route the bar at the bottom of your screen will give you the total route distance, as well as allowing you to Undo the previous waypoint, complete the route ('Done'), or Cancel the route creation. Once you tap 'Done' you're presented with a chance to name the route and Save it.
If you misplaced any waypoints, you can tap & hold on them after you're done creating the route to drag them where you'd like. You can also tap the route to Lock it to prevent accidental changes or deletion.
|
|
| 3 |
To navigate and follow a route, just tap on it and select 'Follow route'. To travel the route in reverse (e.g.: on the way home) you can choose 'Follow (reverse)'.
|
|
| 4 |
The waypoint currently being aimed for is highlighted in orange, and the distance and (magnetic) bearing to get to that waypoint are given. At any time, you can skip ahead or back to the next / previous waypoint using the buttons near the top/right of your screen.
Once you get within 20m of a waypoint the app will start directing you to the next.
|
|
Recording your track
You can record your travels using the Record track function. Note that as this depends on continued use of your phone's CPU and GPS it will shorten battery life while in use. As such, it's not recording by default, and we've added some options to help mitigate this when it is.
| 1 |
Tap Menu and then Record track.
|
|
| 2 |
You can then select how often your phone will be polling for a live GPS location ( every 5 sec / 10 sec / 30 sec / 1 min / 5 min / 10 min), as well as having the option for it to stop recording after a set period (ranging from 30 minutes up to 8 hours).
|
|
| 3 |
At any time, to stop recording your track simply tap the REC notification at the top left.
|
|
Importing & Exporting GPX Files
GPX is a standard format for sharing routes, tracks and waypoints between apps and devices. You can import GPX files (for example, a planned route from another app) and export your marks as GPX for use in other software.
Importing a GPX file
| 1 |
Copy the GPX file to your phone (for example, via email, cloud storage, or USB).
|
|
| 2 |
In Topo4GPS, tap the menu button, then tap Import GPX. Find the location you saved the file, then select it.
|
|
| 3 |
The imported routes, tracks, and waypoints will appear on the map. Tap any route or track to view its details or remove it, tap any mark to navigate to it.
|
|
Exporting as GPX
| 1 |
Tap the menu button, then tap Export GPX. Select the location you'd like to save the file.
|
|
| 2 |
Your marks and any loaded routes or tracks will be exported as a GPX file, which you can then share or open in other mapping software such as Garmin BaseCamp™.
|
|
Units & Settings
The app offers a few settings accessible from the menu:
| Units |
Choose between Metric (km), or Imperial (miles) for distance display.
|
|
| Coordinates |
Choose between Decimal Degrees (Latitude/Longitude) or NZ Map Grid (NZMG) for coordinate display.
|
|
Show/Hide Hunt Blocks or NZ Grid
Offering added familiarity for those used to using LINZ paper 1:50k maps - and to aid with distance estimation - we've added the ability to show
(or hide) an NZTM grid with 1km squares. Also, if you're not hunting you may wish to hide the public hunting block boundaries. To show or hide these, simply:
| 1 |
Tap the menu button.
|
|
| 2 |
Tap 'Hunting Blocks' or 'NZ Grid' to show or hide the layer. If highlighted in orange, they're currently set to show.
|
|
By default, the hunting blocks are shown and the grid is hidden.
Updating the Map
Something we're extremely proud to offer with this product is free map updates. Once you purchase, every time we update the Android map you can get it for free!
| 1 |
Tap the menu button and then 'About'.
|
|
| 2 |
Here you'll see both the app version number and the map version number. Tap Check for map updates.
|
|
| 3 |
If a map update is available, you'll be prompted to download it. Given the maps are >450MB we suggest doing this over WiFi. Once downloaded this updated map will replace your old map.
|
|
|
Android Wearable Help
|
Getting Started
Our Wear OS app is the perfect companion to our phone app. Check your location quickly on your wrist, search 195,000+ NZ place names by voice or keyboard, navigate to marks (or follow routes), track your speed and bearing, and keep track of where you are even if you leave your phone at home.
| 1 |
When you first open Topo4GPS on your watch, you'll see a download screen. If you've purchased the app or started a trial on your phone, you can transfer the map from your phone using Bluetooth, or connect to WiFi to download. The NZ topographic map is approximately 459 MB (download continues even if the screen turns off).
|
|
| 2 |
If you haven't purchased yet, the watch will prompt you purchase or start a trial.
|
|
Navigating the Map
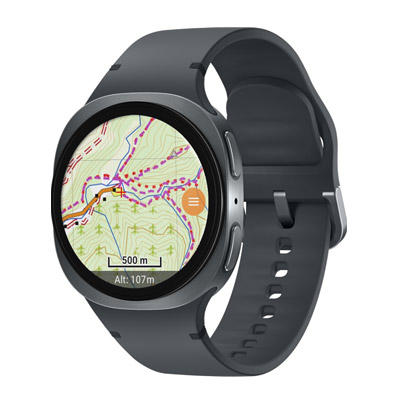
| 1 |
Pan the map by dragging with your finger. Zoom in and out by pinching, or by turning the crown (rotary bezel) on your watch. The map always faces true north.
|
|
| 2 |
The scale bar at the bottom shows the current map scale and updates as you zoom. Your altitude is shown below (e.g. "Alt: 127m") unless you're moving, at which point current altitude is replaced with current speed and (magnetic) bearing.
|
|
Menu
Tap the orange menu button on the right edge of the screen. The menu provides access to all features. Scroll down to see all options.
| 1 |
Lock position: Lock position centres the map on your GPS location and keeps it centred as you move. Toggle it from the menu — it highlights orange when active. Your current position is shown as a red crosshair on the map. Tap the crosshair to see detailed position information including coordinates, altitude, speed, bearing, and GPS accuracy.
|
|
| 2 |
Set mark: Tap Set mark in the menu to place a mark at the centre of the screen. Pan the map to where you want the mark before setting it.
|
|
| 3 |
Search: Tap Search in the menu. Your watch will open the system input screen where you can use voice dictation, the keyboard, or handwriting to enter a place name. Results are shown sorted by distance from your current position. Tap a result to jump to that location on the map.
|
|
| 4 |
Sync Overlays: Tap Sync overlays in the menu to sync marks, routes, and tracks between your phone and watch via Bluetooth. This requires your phone to be connected and Topo4GPS to be installed on it.
The sync adds any overlays from your phone that aren't already on your watch, and sends any marks you've created on the watch back to your phone. It never deletes anything on either device.
|
|
| 5 |
Clear routes/tracks: Clears any routes & tracks from your watch.
|
|
| 6 |
Settings: Tap Settings in the menu to:
Toggle public hunting block boundaries: Turn these on so when in the field you can be certain whether or not you're within the permitted hunting block. Highlights orange when active.
Toggle visibility of NZ Grid: The 1km NZTM grid overlay is on by default, visible at zoom level 13 and higher. Toggle from here — it highlights orange when active. The grid aligns with the grid references on LINZ Topo50 maps, and represents 1km squares, making it an excellent tool for estimating distances.
Change measurement units (Metric or Imperial) and coordinate format (Decimal, DMS (Degrees, Minutes, Seconds), or NZTM). The scale bar updates to match your unit preference.
|
|
| 7 |
Exit: Tap Exit in the menu to close the app.
|
|
Using Overlays (marks and routes) for Navigation
Marks and routes provide an excellent way to visually represent your planned destination or path, and also to navigate to or along said destination or path.
| 1 |
Marks: Tap any mark on the map to see options: Navigate to (shows distance and bearing), Lock/Unlock (prevents accidental deletion), or Delete.
When navigating to a mark, the mark name arcs along the top of the screen. Distance and magnetic bearing are shown below it in orange. Tap the ✕ button to stop navigating.
|
|
| 2 |
Following a Route: Tap a route on the map to see options including Follow route and Follow (reversed). The active waypoint is highlighted in bright orange on the map.
The route follow bar shows distance and bearing to the current waypoint, plus your progress (e.g. 3/12). Use ⏮ and ⏭ to go to the previous or next waypoint. The route automatically advances to the next waypoint when you're within 20 metres. Tap ✕ to stop following.
|
|
Tips: Battery life — GPS tracking uses battery. If you're not actively navigating, closing the app helps conserve power.
Flight mode — In areas without cell coverage, switch your watch to flight mode to save battery. GPS continues to work in flight mode.
Downloading the map — Transfer directly from your phone or use Wi-Fi for the initial download. The download continues in the background if the screen turns off.
 Still
stuck? Send us a message here... Still
stuck? Send us a message here...
Find our Android Privacy Policy here.
|